This post will guide you through the steps on how to successfully make the upgrade of your Tomcat from version 5 to 6 in BOXI 3.x to remove the risk produced by a security hole. The process was done in an environment with Windows Server, SAP BusinessObjects Enterprise XI 3.1 SP3 and Apache Tomcat 5.5. The new Apache Tomcat used was version 6.0.36.
Resolution and steps
All instructions below are using default paths for SAP BusinessObjects and Tomcat 6 installations on a Windows system where the files are put in to “C:Program Files”; you can change replace these folders with your own ones.
1) Download Tomcat 6.0.x service installer (Where the x is the version that you want).
2) This step is only needed if your SAP BusinessObjects installation does not have the Java JDK installed:
2a) Download the JDK 5.0 Update 22.
2b) Install the JDK 5.0 Update 22 package.
3) Run and install the Tomcat 6.0.x executable. The Welcome screen will appear. Click Next.
4) Click "I Agree" on the License Agreement screen.
5) Select the install type from drop down box & click Next.
6) Enter the destination folder where Tomcat 6 is to be installed. Click Next
7) Enter the user name & password for Administrator login & click Next.
8) Enter the below mentioned path that points to JRE supplied with BOE XI 3.1 (or the JDK in “C:Program FilesJavajdk1.5.0_22” that was installed in step 2). Click Install.
9) Uncheck the "Show Readme" check box. Click Finish.
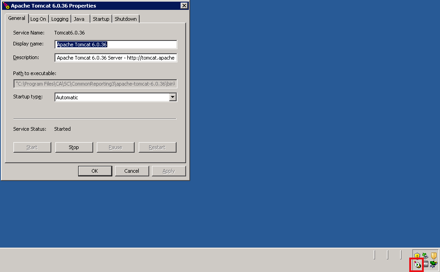
10) Tomcat will now start. There will be a small icon in the system tray as shown below.
11) In case that your system is 64bit you can download the Tomcat 6.0.x 64 bit binaries. You need both the tomcat.exe and tomcat6.exe files.
11a) Stop Tomcat and then overwrite your tomcat.exe and tomcat6.exe files in the directory where you installed Tomcat to “C:Program FilesApache Software FoundationTomcat 6.0bin” after backing up the current files.
11b) Start Tomcat service again.
12) Right click on the icon & click Configure.
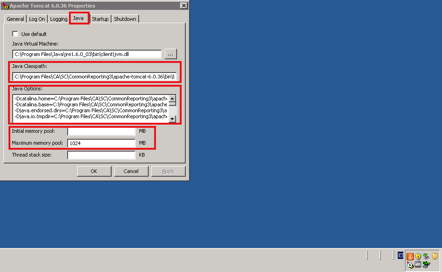
13) The Apache Tomcat Properties screen will appear. Click on Java tab.
14) Add the path "C:Program FilesBusiness Objectsjavasdklibtools.jar" in Java Classpath field after the existing entry separated by a semi-colon (;).
15) Add the value 1024 (the value depends on your RAM) in Minimum and Maximum memory pool field.
16) Add the following values in the Java Options field.
-Dbobj.enterprise.home=C:/Program Files/Business Objects/BusinessObjects Enterprise 12.0/ -Xrs -XX:MaxPermSize=512M -Dbusinessobjects.olap.bin= -Dbusinessobjects.olap.stylesheets=C:/Program Files/Business ObjectsOLAP Intelligence 12.0/stylesheets/ -Djava.awt.headless=true -Daf.configdir=C:/Program Files/Business Objects/Dashboard and Analytics 12.0
17) Click on Apply, OK and restart the Tomcat service.
18) Open the file config.tomcat6 in Notepad. It can be located in "C:Program FilesBusiness Objectsdeployment" folder.
19) Uncomment the variable "as_service_name".
20) Assign the following values to the respective variables:
- as_dir=<installation directory of Tomcat 6>
- as_instance=localhost
- as_service_name=Tomcat6
21) The file should look something like this:
##
## Business Objects Configuration Utility
##
# as_dir: the installation directory of the application server
as_dir=C:Program FilesApache Software FoundationTomcat 6.0
# as_instance: the application server instance to deploy to (represents the name of a folder in the conf/Catalina directory)
as_instance=localhost
# as_service_name: on windows, the name of the tomcat service when tomcat is installed as a service
as_service_name=Tomcat6
# as_service_key: on windows, when tomcat is installed as a service, the name of the key where the java startup parameters are stored
# (there is generally no need to touch this)
as_service_key=HKLMSOFTWAREApache Software FoundationProcrun 2.0${as_service_name}ParametersJava
# as_service_key_value: name of the String value where the java startup parameters are stored, in the key pointed to by as_service_key
# (there is generally no need to touch this)
as_service_key_value=Options
22) Save & close the file.
23) Open the file tomcat6.xml in Notepad. It can be located in "C:Program FilesBusiness Objectsdeployment" folder.
24) Make sure that the file has the correct path to the Tomcat6.0.x executable. This path is the one where Apache Tomcat was installed.
<exec dir="${as_dir}/bin" executable="${as_dir}/bin/Tomcat6.0.36.exe" failonerror="false">
25) Assign the right value to the respective variable in case it does not have it.
26) Save & close the file.
27) In the “C:Program FilesApache Software FoundationTomcat 6.0conf” directory create a folder called Catalina. Within the Catalina folder create another folder called localhost
“C:Program FilesApache Software FoundationTomcat 6.0confCatalinalocalhost”
28) Open Command Prompt (Always as Administrator) by clicking Start, Run, type "cmd" and click OK.
29) Change the deployment directory within the SAP BusinessObjects installation path you installed to ("C:Program FilesBusiness Objectsdeployment").
30) Run the command "wdeploy tomcat6 deployall".
31) A BUILD SUCCESSFUL message will appear once deployment of all WAR files is successful. If not, you need to review the failures and correct as needed.
32) Apache Tomcat 6.0.x is now deployed to and configured for usage with SAP BusinessObjects Enterprise XI 3.1 SP3.
33) You can now use the Windows Services management tool or the Tomcat Configuration tool to set Tomcat to automatically start on system boot if you wish.
With this easy guide for the upgrade you should be all set for your installation. We hope that this helps you make a fast transition for your applications by closing the security risk.
If you have any questions or anything to add to help improve this post, please feel free to leave your comments.


