Following my first experiences using SAP BusinessObjects platform 4.0, I decided to write this article after spending 3 days to discover how to install Data Services 4.0 in a distributed architecture. Why did I spend so much time to figure this out? There is something different in the new Data Services: SAP has tried to unify the security and the control of the servers using the CMC. With this new feature we will be able to manage Data Services users and services using the CMC instead of using the Data Services Management Console. This has brought slight changes to the installation process of Data Services 4.0 in comparison with other releases.
I was working with a distributed architecture, which means that I was planning to install the SAP BusinessObjects platform (including Live Office, Dashboard Designer 4.0, Client Tools and Explorer) in one server, let’s say “ServerA”, and Data Services 4.0 in a separate server named “ServerB”.
If you have installed older version of Business Objects such as XI R2 or XI3.0 and 3.1, you know that we would install BusinessObjects platform in ServerA and Data Services in the ServerB and then we would see that we don’t have Data Services intragrated with the rest of the platform and probably we would see the same in the CMC that is shown in the image below.
As you can see this image comes from a SAP note that explains how to solve this problem on past releases, but if you installed Data Services 4.0 in a distributed architecture, the error won’t be solved using the solution described in the SAP note 1615646.
Once the scenario is clear let’s start with the process to install Data Services in a distributed architecture. Before starting ensure that BusinessObjects 4.0 platforms and the client tools with their latest service packs and patches are installed in the ServerA.
Step 1: Install Data Services 4.0 in ServerA
As in every new software that has to be installed the first step is uncompress (if needed) the file downloaded from SAP service market place in the ServerA. Open the root folder, go to data_unit and run the setup.exe. After that chose the language to use during the installation.
After these “typical” steps the installation program checks for required components. Review the results and decide whether to continue with the installation, or abort and correct any unmet requirements.
In the next three steps you have to review the SAP recommendations, accept the license agreement and finally, fill the gaps with the license key code, name and company. Once the license key is verified you can chose the support language packs you wish to install.
Then it is time to choose the folder, but in this case, the wizard doesn’t let you choose because BO platform was install before so it takes the BO installation folder as a default.
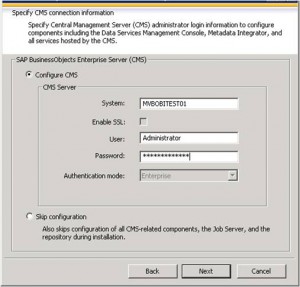
After that you have to configure CMS information. In this case our ServerA is going to be named “MVBOBITEST01”
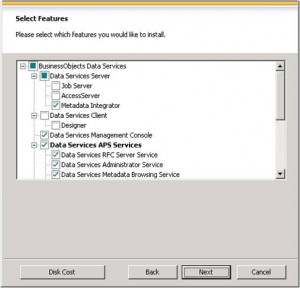
This is the important step! The next screen invites you to select what you want to install. In ServerA you have to install all (if needed) Data Services’s features apart from Designer, Job Server and Access server. See the image below.
The subsequent screen will ask for merging with an existing configuration. In this case no existing configuration can be reused so the answer is: skip configuration.
Then you can choose if you want to use an existing data base server or you want if you want to skip this part and do it after the installation. Chose what suits you best. Imagine that you or your vendor doesn’t have the database or schemas for the CMS repositories ready when you were planning to install Data Services. In that case, you can configure the CMS parameters after the installation without problems.
After filling in the information for the CMS systems data base and the Audit database (if required), the Metadata Integrator configuration starts. I am not going to describe this step in depth because it hasn’t got an impact on our installation. Furthermore, configuring Metadata Integrator is not difficult; as always you only have to choose the ports, folders and the name.
Once we have finished installing Metadata integrator and ViewData, the installation will start. After the installation process we can proceed to the next step.
Step 2: Install Data Services 4.0 in ServerB
After a few hours installing the first part of Data Services we are ready to install Data Services in a dedicated server which is going to have the ETL only.
Again it is time to uncompress the file you downloaded before, run the DVD or whatever is the installer you are using. Run the setup.exe.
Once the installation starts, we are going to repeat the same firsts steps mentioned before until we reach the screen to specify CMS information. Add the CMS information related with the ServerA or “MVBOBITEST01”. Why? Because we don’t have CMS installed in the ServerB.
Choose the components that we did not choose before during the BusinessObjects server installation: Job Server, Access server and Designer.
As we did in the ServerA installation choose skip the configuration if no previous configuration exists.
In the next step you have to configure the account on which you would like to run Data Services. You can choose to run it using a system account or run it with a specific service account previously defined. What is good about using a service account rather than a system account is that if you want to stop a service (like Data Services Job Server) you need the password of this account, because it is not related to the system account with which you log onto the S.O.
Then configure the Access Server. In this case I kept the default values.
After the last step the wizard asks to start the installation. After a couple of hours you will have Data Services 4.0 running.
There is another important point after the installation process that I will be covering on my next article due on the beginning of May: the repository configuration. One of the new and best features of Data Services 4.0 is the integration with the BO platform using the CMC, which results in a complete integration when you configure the repositories properly.
If you have any questions or other tips, share it with us by leaving a comment below.


