While Microsoft Office 2010 has been available for retail since June 2010, the latest version of Xcelsius (2008 SP3 FP3.3) is not yet officially supported. At the moment you are supposed to run it with Office 2003, XP or 2007. But you may be interested to know what happens if you try to install Xcelsius 2008 on a computer which "only" has Office 2010…
To begin with, you get the following message:
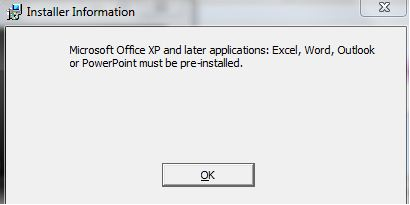
In reality, Xcelsius 2008 will work fine with Office 2010. The only question is, how do you get rid of this installation problem? A possible workaround is to install an earlier version of Excel, install Xcelsius, then remove the older Excel. But it takes time, and you probably don’t have any installer file for an earlier version of Office.
The purpose of this post is therefore to allow to you to perform the installation of Xcelsius 2008 with Office 2010 in a quick and efficient way. The principle of the workaround is to prevent the installer from checking the presence of Office on the computer by tweaking it.
Prerequisites:
- An Xcelsius installer file. For this article I’ve downloaded the file xcelsiusent2008sp3.exe from SAP Business Objects Software Downloads.
- A license key available on service.sap.com/support – Keys & Requests
- InstEd, a free MSI editor
- A software able to extract data from zip-formatted files. 7zip works fine and is free – also for commercial use.
Steps:

- The Xcelsius installer file is a zip archive. Extract the data from it.
- Download the latest version of InstEd and install it on your computer.
- Make a backup of the "Xcelsius.msi" file located in the "package" folder. If you make any mistake with the msi file you'll be able to recover it.
- Open with InstEd the" Xcelsius.msi" file. On the left part of the screen, in the "Tables" tab, click on "LaunchCondition". On the right side you’ll see a list of conditions that are checked.
- Delete the row which refers to Office (it begins with "(EXCELl10 OR OUTLOOK10") and save the file.
- Now execute the "Xcelsius.msi" file you’ve just modified. You shouldn't have any error message regarding Office anymore. Accept the license agreement (although it may not be displayed), enter your name/organization/keycode (license key) and choose the options you need. After copying some files, the program will tell you it's finished installing Xcelsius.
- You may meet another problem during the first run of the program: although you entered a valid keycode, Xcelsius considers it as expired. Entering the keycode again won't solve the problem. The trick is to execute Xcelsius as an administrator (display the option by right-clicking on the program icon).


Now entering the keycode will result in the opening of Xcelsius.
Note: the tests were done on Windows 7. If you meet with other behaviors on different platforms, please let me know!